My programming started in 1979 with the TRS-80 Model I, but in late 1981? early 1982?, I got my Atari 800, and later a 1200XL, then Atari ST. Those are what I consider "my computers".
Last few weeks for hobby time, I've taken up playing with an Atari 8-bit emulator, and may soon buy an old machine (130XE? I guess?) and a modern SD-card reader, and HDMI adapter unless I want to set up my old CRT… Yes, this is "pointless", but it's the most emotionally rewarding programming I've done in some time.
Had to do a lot of setup to get to this point, though. Follows are my excessive notes, which will hopefully be useful to others.
- Set up the Atari emulator from Atari800MacX - or whatever runs on your system
- ROMs from various places
- Docs for the Atari800 emulator USAGE
- Atari BASIC Quick Reference Guide
- Atari BASIC Reference Guide
- De Re Atari, by Chris Crawford: Maybe the single best programming book ever written. Flip back to Appendix B: Human Engineering and it still applies 100% to modern computing.
- Atari 800XL Owner's Guide
- Inside Atari DOS
- Mapping the Atari
- Atari Assembly Language Programmer's Guide
- Antic Magazine: page down a ways to get to the start of the magazines
- Antic Podcast
The keyboard mapping in AtariMacX is weird, I finally figured out:
| Mac Key | Atari Key |
|---|---|
| ` | Break |
| F2 | Option |
| F3 | Select |
| F4 | Start |
| F5 | Reset |
| Sh-F5 | Cold Boot |
| Opt-F5 | Insert Char (be REAL DAMN CAREFUL not to miss the Opt key!) |
| Sh-Opt-F5 | Insert Line (same, DANGER WILL ROBINSON DANGER) |
| Home / Opt-F7 | Clear |
| End | Atari/Inverse |
| PgDn / Opt-F10 | Help (XL/XE) |
| Opt-F1 | F1 (1200XL) |
| Opt-F2 | F2 (1200XL) |
| Opt-F3 | F3 (1200XL) |
| Opt-F4 | F4 (1200XL) |
| Capslock | Cycle caps, may take several tries of caps A backspace repeat until you get lowercase, not graphics or uppercase. |
| Sh-Capslock | Uppercase, almost always works |
Typing on a real Atari keyboard is probably the #1 reason to get real hardware instead of emulation.
Immediately it comes rushing back, how much I didn't like the default environment of blue screen, clicky keyboard, inset margins. Easy to fix with a few pokes, but I don't want to do that every time I reboot, so I need a startup program.
- First, configure Atari800MacX with the subdirectories next to it. It comes with all these folders in user space, but it's actually mapped to somewhere in /var, which is awful.
- Make a boot disk. Media -> Disk Image Conversions -> XFD to ATR, pick the
DOS25.XFDimage in OSRoms, and call thatboot.atr, store it in Disks, Load it in D1 Cmd-1 and pickboot.atr. - Reboot into DOS, by Control -> Disable BASIC. Bask in the glory of Atari DOS 2.5.
- Make a data disk, Media -> New Floppy Image, I went with Medium Density (130K) since almost everything can read that, assign to Drive 2, and call that
disk2.atror whatever.- From Atari DOS, Format:
I <return> D2: <return> Y <return> - Preferences -> Boot Media -> Set to Current Media, Save Configuration
- From Atari DOS, Format:
- My Atari BASIC project on Gitlab
- Based on what I remember of my old main menu, I had a ton more stuff but I'm slowly adding routines as I need them. This can also be a shell for new programs, delete 11-9998 and use the subroutines. I wrote Draw to test joystick & function key scanning, not to be a good paint program, typed in a Music demo to make sure I had sound working.
- Digression: This is not an efficient structure, because high line numbers take longer to find; an optimizing Poindexter would put the subroutines tightly packed at 1-999 and the program at 1000+, but it's massively easier to read & work with this way. I won't be in BASIC that much anyway, it's just for utility work.
- Download
AUTO.LST, convert Unix newlines (char 10) to the ATASCII newline (char 155õ), and drop it in the HardDrive1 folder. % LANG=C tr '\233' '\n' <AUTO.LST.TXT >AUTO.LST- Or you can just Media -> Edit an .ATR disk image, import file, and that has a newline conversion.
- From BASIC,
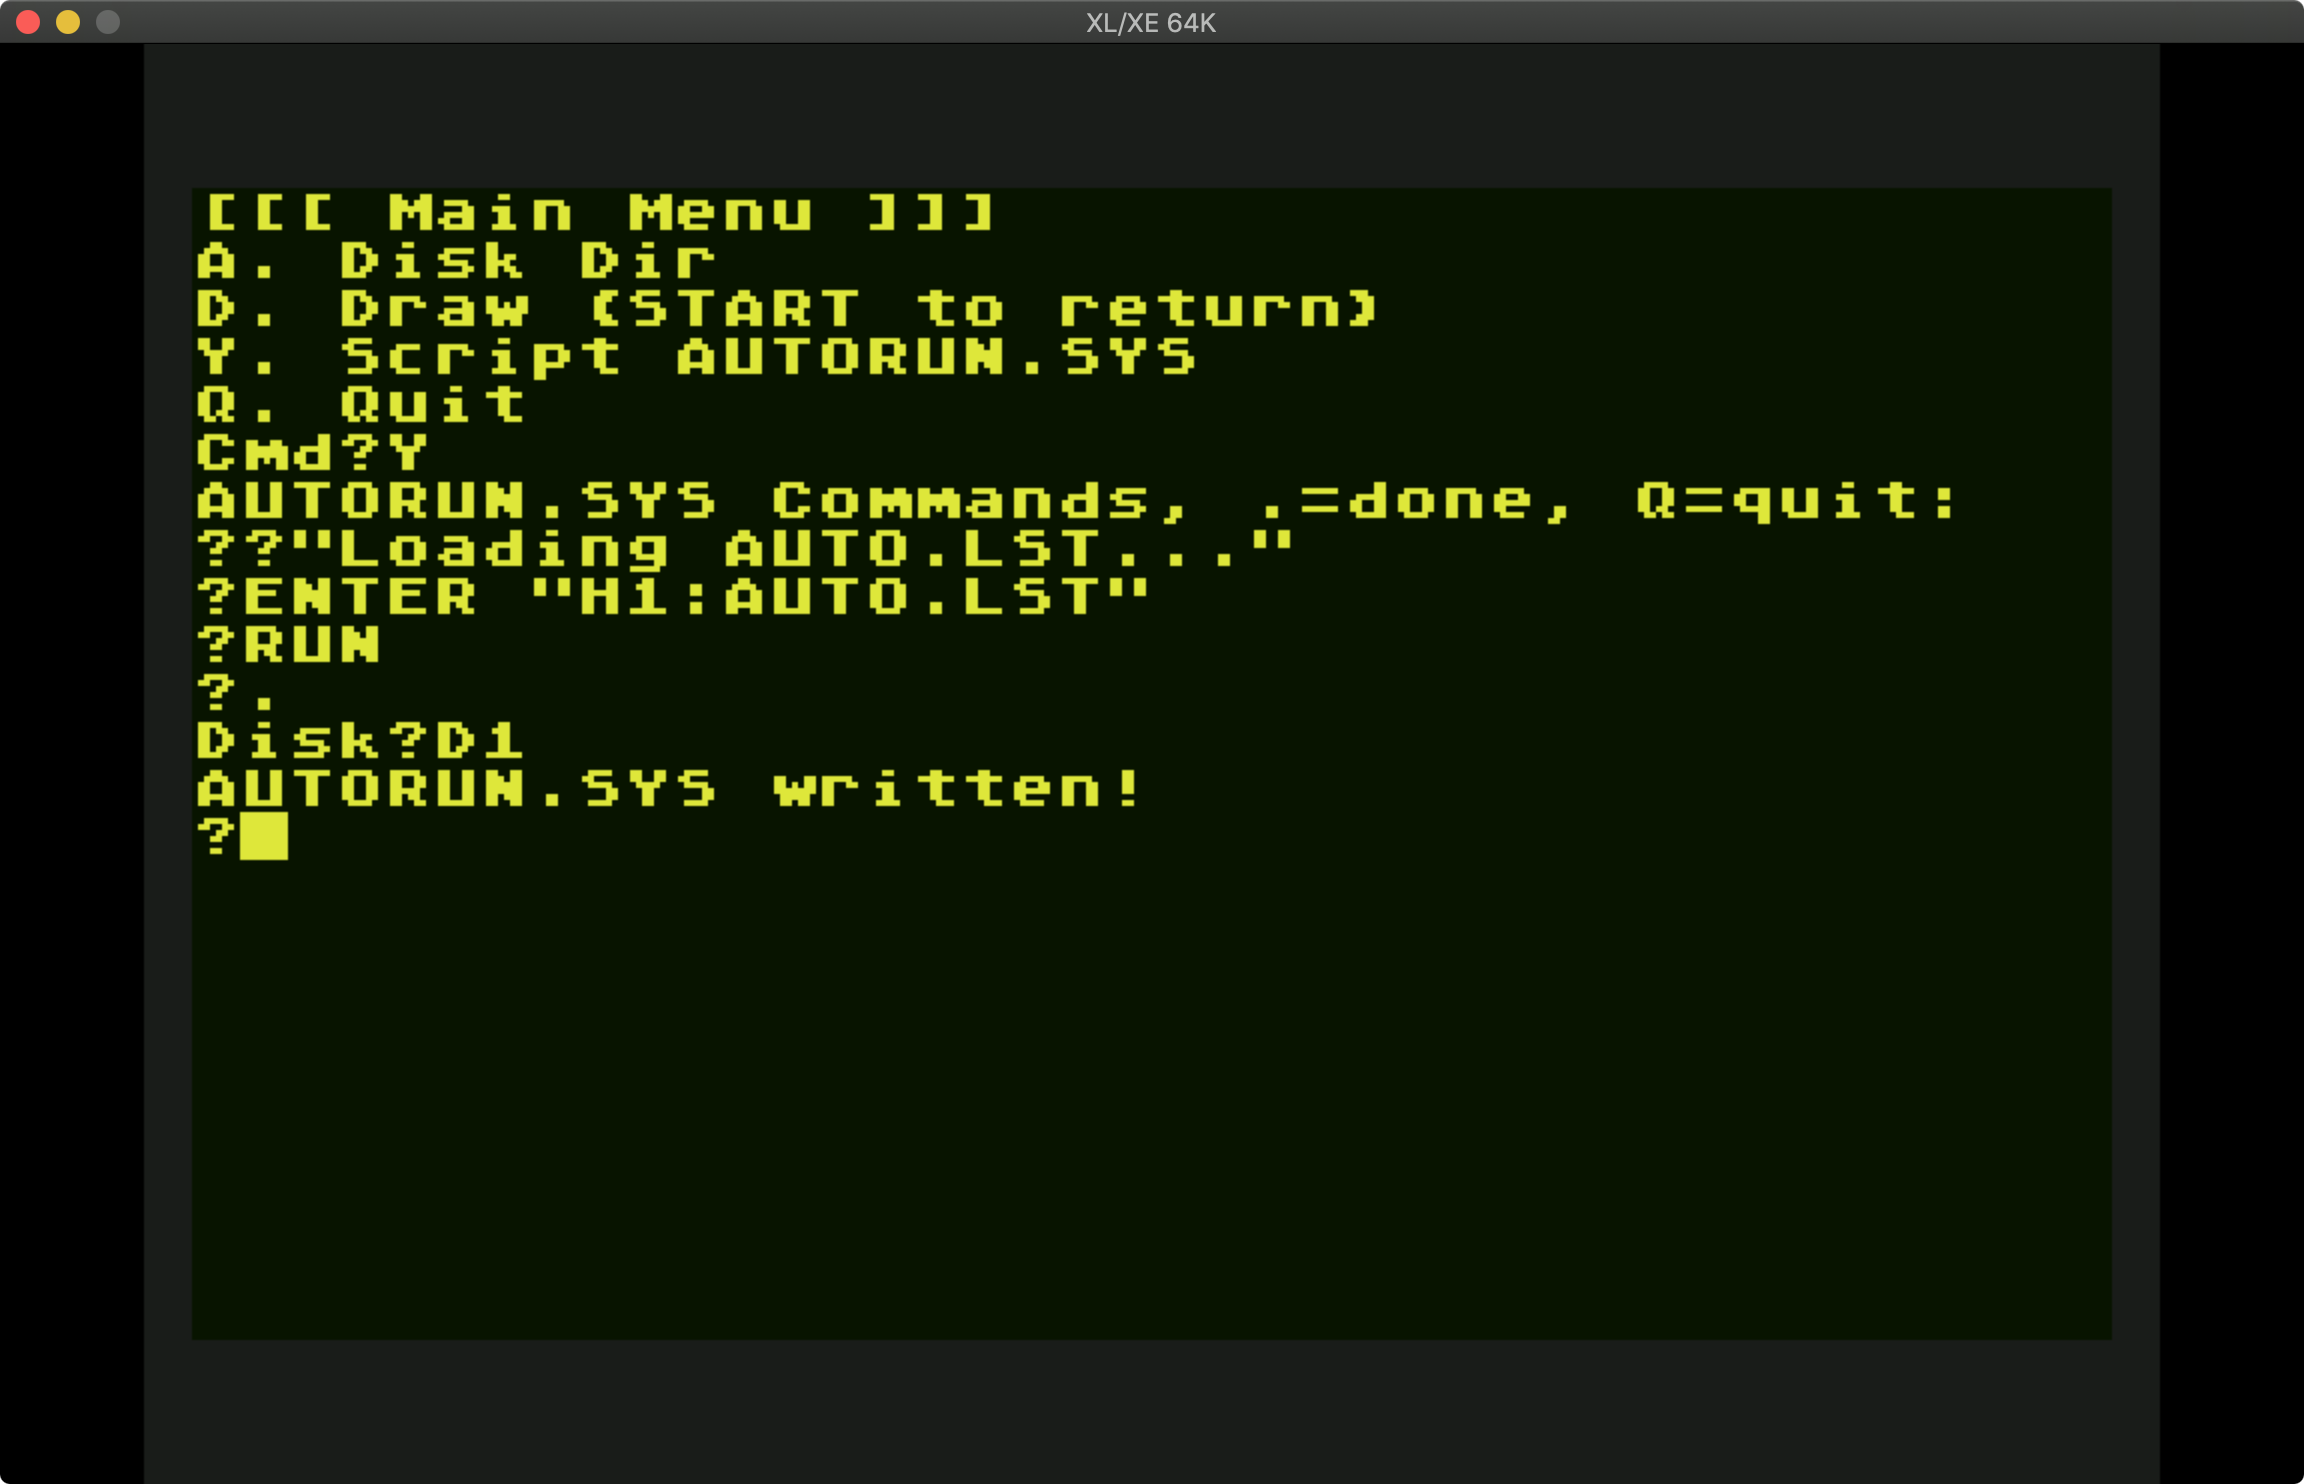
E."H1:AUTO.LST" <return> RUN <return>, pickY. (Script AUTORUN.SYS), and enter:- ?"MAINMENU"
- E."H1:AUTO.LST"
- RUN
- .
- Change H1 to D1 if you saved it in your
boot.atr. - Now it'll do that on every bootup from that floppy. Reboot to be sure it works.
- If you make changes to your main menu, remember to
LIST "H1:AUTO.LST". I use LIST/ENTER (text LST format) instead of SAVE/LOAD (tokenized BAS format) so I can read it from the Mac; BAS is slightly smaller and much faster to load/save, but it doesn't matter with emulation or an SD-card. -

- Based on what I remember of my old main menu, I had a ton more stuff but I'm slowly adding routines as I need them. This can also be a shell for new programs, delete 11-9998 and use the subroutines. I wrote Draw to test joystick & function key scanning, not to be a good paint program, typed in a Music demo to make sure I had sound working.
-
BASIC set up and tested, and it's a convenient place for little utilities, but now for real programming.
-
Atari Macro Assembler and Program Text Editor
- Download this, read the fine manuals; more for MEDIT than the assembler unless you're really hardcore. I will probably do little or no assembly, even tho back in the '80s I could hand-assemble short programs directly into ATASCII codes to run from BASIC; bug-eating freak that I was.
- Read the MEDIT manual. It's quite a respectable full-screen editor with command mode for search/replace, block editing, etc.
- Open the
Atari Macro Assembler and Program Text Editor.atx(ATX is write-protected or encrypted or something; you can't use them directly, and have to disable the SIO speedup hack in emulator) disk in drive 2 of your Atari (Cmd-2), Control -> Disable BASIC (which will reboot to DOS). So you want the program files off that:- DOS:
C <return> D2:MEDIT,D1:MEDIT <return> - DOS:
C <return> D2:MEDITCM.BAS,D1:MEDITCM.BAS <return> - DOS:
C <return> D2:AMAC,D1:AMAC <return>(skip if you'll never write ASM) - DOS:
C <return> D2:SYSTEXT,D1:SYSTEXT <return>(I think only needed for AMAC?) - Eject: Ctrl-Cmd-2
- Reload your data disk, Cmd-1,
disk2.atr.
- DOS:
- Control -> Enable BASIC,
LOAD "D1:MEDITCM.BAS" <return> RUN <return>and configure MEDIT however you like.- Language: PAS
- Tabstops: Set at 5 and +4 after the existing ones, because 8-wide tabs are crazy in a 40-column screen. Yes, I'm a tabs not spaces guy, OBVIOUSLY.
- Margins: 1,40
- Colors: 12,4,14 (sadly can't be 0 or 2 background luminance, because the cursor is black)
- Flags: Tabs: Expand, Shift-Lock: No (starts in lowercase).
- Save & Return to DOS.
- You can just copy the MEDITPAS.ECF to MEDITTXT.ECF, etc., you don't need to run the tool for each language, but it doesn't have a default mode. Note you also have to copy these to each disk you're editing on, or it switches back to the stupid defaults:
- DOS:
C <return> D1:*.ECF,D2: <return> - DOS:
L <return> MEDIT <return>, filenameD2:HELLO.PAS, and enter:program hello; var c: char; begin writeln('Hello, Atari!'); read(c); end. <option> exit <start>to save & exit. Note return doesn't execute commands in MEDIT, start does. Kids Today™ have some meme about how hard it is to exit vi? Ha ha, they have no idea. RTFM.
-
Finally ready to program in Action! or Pascal, which is what I mainly did back in the day.
- Deep Blue C: Tragically underpowered version of Small-C. I loved it as an intro to C, but didn't use C for real until the Atari ST. It did produce standalone binaries and the compiler was easy to use, IIRC.
UNSUPPORTED FEATURES Features in C not supported in DEEP BLUE C are: 1) structures, unions 2) multidimension arrays 3) Floating point numbers 4) Functions returning anything but int 5) Unary operators: sizeof 6) Binary operators: typecasting DIFFERENCES FROM STANDARD C THE DEEP BLUE C language has the following nonstandard features: 1. The last clause of a "switch" statement, either "case" or "default", must be terminated with a "break", a "continue" or a "return" statement. 2. The ancient =<op> construct has been removed. Use <op>= instead. 3. Characters are unsigned. Chars range in value from 0 to 255. 4. Strings can not be continued on the next logical line. 5. C source code lines can be a maximum of 79 characters long. 6. Functions can have a maximum of 126 arguments. SPECIAL SYNTAX C uses several ASCII characters not available on the ATARI computer's keyboard. In particular the braces have been replaced by to two-letter combinations $( and $), and the tilde has been replaced by $-. The $ character is not used in C, so your editor's find and replace command can be used to convert standard c programs into a format acceptable to DEEP BLUE C. - Action!: Custom language on cart for Atari, fantastic built-in editor (later the basis for the Paperclip word processor!), had a disk runtime system so you could distribute programs (also on AtariMania). But it came out a little later than my Pascal adventures, and it's a weird super-low-level language, and I think I'm in no mood to relearn it right now. Super goddamned fast, tho. May get into this if I'm frustrated later.
- APX Pascal: Excessively complex process with a disk swap for every compile, compiles & links into PCode, no explanation of how to boot it. This is a very user-hostile compiler.
- Kyan Pascal: Maze of command line tools. Doesn't work, at least for me, on emulation. It cycles through the tools, but never actually builds anything, eventually crashes and corrupts video. Makes a big deal of being usable from RAMDisk, but that doesn't matter on modern hardware.
- Draper Pascal: Which I used in the '80s. Hilariously bad editor (but I can use MEDIT, so fuck that), compiler just fucking works, but only produces PCode (
.PCD), so has to start from bootdisk or run Draper's menu then your program, ick. But this was no trouble to get running, so it wins.- Insert
drpascal.atrin drive 1, reboot, boots into a menu. - 3 Compile program: D2:HELLO.PAS
- 1 Run program: D2:HELLO
- Total success!
\o/Hit any key to exit the program. - Drive 1,
boot.atr, Drive 2,drpascal.atr, reboot - DOS:
C <return> D2:AUTORUN.SYS,D1:PASCAL.COM <return> - DOS:
C <return> D2:INIT.PCD,D1:INIT.PCD <return> - Cmd-2,
disk2.atr - So now I can: DOS:
L <return> PASCAL.COM <return> - And run Pascal programs. I could make a more focused runtime menu for it, maybe dir & list all the PCD files, the
INIT.PASsource is included. If I ask it to compile, it prompts to insertdrpascal.atr, and then I can switch back, which is reasonable. - Standard library is small but effective, seems like it has all the BASIC equivalent commands, and enough POKE/PEEK/ADDR stuff to let me do everything, including Player-Missile Graphics.
- I can presumably now move all my source and
disk2.atrcontents to H1, so they can be managed & edited on the Mac, but I just wanted to get things running first. - Probably make another gitlab project (and actually sync it from git) when I get somewhere with that.
- Insert
- Deep Blue C: Tragically underpowered version of Small-C. I loved it as an intro to C, but didn't use C for real until the Atari ST. It did produce standalone binaries and the compiler was easy to use, IIRC.
This took quite a lot of my hobby time doing something harder than actual work, to be honest. But I'm in a good place with it now.